During this project I managed to weigh the piece during the various stages of production. The weight desired was 60 ounces.
This just illustrates how much steel is lost due to scaling during the forging process. For heavy forging not requiring forge-welding I use anthracite as is the case here. Forging with charcoal does consume less of your material.
A 16.5cm length of 4.5cm diameter piece of axle steel was cut: 2114 g / 75 oz
After drifting and forging to shape, and including the weight of the plug removed from the eye: 1861 g / 65 oz
Grinding and filing: 1728 g / 61 oz
After polishing: 1703 g / 60 oz
The hammer head is 19cm long and 11.5cm measured from the face to where the eye starts. The face is 30mm square and heat treated.
Tuesday, 4 November 2014
Thursday, 16 October 2014
Training equipment
A federschwert (training sword) and a painted steel buckler. The paint helps prevent rust on the buckler surface.
Thursday, 9 October 2014
The companion dagger to the Winelands sword
Winelands theme sword project
This project was completed a few years ago and I just thought I would share it.
The grip was stitched along one side while the leather was still damp and pliable. I had to keep the leather at exactly the right consistency for the tooling (to dry and the relief won't be well defined, too wet and the design ends up looking worn and ill defined and you also risk punching or cutting too deep into the substrate).
The scabbard also featured a simple window with vines design.
Tuesday, 7 October 2014
Making a laced scabbard in the 11th century style
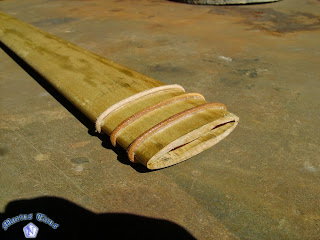
The wooden core has been shaped and the three leather risers glued in place. After all this is done, the scabbard core is varnished to waterproof the wood. Beeswax works just as well. The leather is going to be fitted while damp and the moisture will warp the wooden core if it is not sealed.
Here the leather has been cut to shape. It has to be measured to fit precisely, too loose and it will not sit tightly around the wooden core, too small and the seam will pull open. Vegetable tanned leather is used as it becomes pliable while damp and toughens when it dries. The leather is then pierced evenly on both sides of the seam. While stitching, keep the leather damp as it allows you to conform the leather to the core and the soft leather will form a neater seam.
The chape was made of 1.2mm brass sheet. A steel former was used and a light raising hammer to shape it correctly.
Brass pis holding the chape in place. No glue is needed. If the chape fits snugly enough(a few firm taps with a mallet is needed to move it into place, the two pins are more than enough to secure it in place. Of it is seated loosely, the pins will eventually shear out of the wood and leather underneath. Very important: Even though the wooden core is sealed, there is still the chance of a little bit of damp from the wet leather reaching the inside. The tannic acid from the leather along with the damp environment inside the scabbard will rust a blade rather quickly and deeply. Completed scabbards must be allowed to dry out fully for about two days depending on humidity before the sword can be safely stored in them. Once dry, the leather is sealed with leather fat (Dubbin etc.) and heated gently for the leather fat to penetrate deeply. A brisk rub with a soft cloth afterwards and all is done.
A view of what I did at the back. This scabbard follows the trends illustrated in period manuscripts while not being a copy of a specific scabbard. The world of 11th century scabbards is still an interesting area of research and thee are still many other designs that I will hopefully be able to demonstrate soon.
Saturday, 27 September 2014
Thursday, 25 September 2014
Mostly done, I just need to clean up the hide-glue stains and engrave the brass plate.
The blade is 83cm long and 5cm wide at the base. The centre of balance is 17.5cm in front of the guard and total weight is 1.145kg. Grip: 10.7cm with limewood core with calf-skin covering.
I am starting work on the scabbard soon.
Thursday, 18 September 2014
Ironwork
A few items for the house made during a brief one day detour into the gentle art of blacksmithing before returning to the usual blade oriented routine. It does help one relax and reset before continuing with a challenging project.
Subscribe to:
Posts (Atom)


.jpg)


